PhoneGap 3.4 Environment Setup and Create Cordova Project
It’s been a long time to
identify the working functionality of Cordova or PhoneGap versions 2.7 to 3.4 (2.7.0, 2.8.0, 2.8.1, 2.9.0, 3.0.0,
3.1.0, 3.2.0, 3.3.0, 3.4.0) for Windows.
I went through many blogs and forums to setup my Cordova or PhoneGap
environment at office. As you know most of our organizations does uses the
proxy network and it will block your process in the middle of your setup.
Because, now PhoneGap is dependent on Node
JS, Apache Ant, Java JDK and Android SDK, so you have to be complete on
setting up those requirements.
Now here I am going to
tell you the complete PhoneGap setup up in few steps with Eclipse IDE.
Requirements:
1)
Java JDK
Note: Make sure you download 32 bit JDK and version
above 6, most cases Android SDK does not find Java and you will face the issue
like “JDK Not Found” error.
2)
Node JS
Note: Windows Installer
(.msi) 32 bit version
3)
Apache Ant
Note: zip archive binary
version
4)
Android SDK
ADT Bundle for Windows
5)
Cordova
Archive File
Note: Source zip
Download all the required
files from above locations.
Installation steps:
1)
Java
Install
Java in your system and setup the environment variables for JDK as below.
1)
Variable Name: JAVA_HOME
Variable Value: C:\Program Files\Java\jdk1.7.0_45;
2)
Variable Name: PATH
Variable
Value: %JAVA_HOME%\bin;
Now
check your Java environment is set
Open
Command Prompt and type command java –version
like below and check your java version is displayed.
2)
Node JS
Install Node JS, Node JS will set his environment
variable himself
Now
check your Java environment is set
Open
Command Prompt and type command java –version
like below and check your java version is displayed.
If Node JS version is not displayed then follow
bellow steps to set environment variable for Node JS else skip it.
1)
Variable Name: PATH
Variable Value: C:\Documents and Settings\Your Name\Application Data\npm;
2)
Variable Name: PATH
Variable Value: C:\Your Installation Path\To Node JS\
3)
Apache Ant
Install
Apache Ant in your system and setup the environment variables for Apache Ant as
below.
1)
Variable Name: ANT_HOME
Variable Value: C:\Your Path\To Ant\apache-ant-1.9.3;
2)
Variable Name: PATH
Variable
Value: %ANT_HOME%\bin;
Now
check your Apache Ant environment is set
Open
Command Prompt and type command ant –version
like below and check your Apache Ant version is displayed.
4)
Android SDK
ADT Bundle for Windows
Download
and extract your bundle in your development environment. Make sure do not
change the extracted folder structure of eclipse,
sdk and SDK Manager.exe.
Setup
the environment variables for JDK as below.
1)
Variable Name: ANDROID_SDK_HOME
Variable Value: C:\Location To\Your Work\Environment\adt-bundle-windows-x86-20131030\sdk;
2)
Variable Name: PATH
Variable
Value: C:\Location To\Your
Work\Environment\adt-bundle-windows-x86-20131030\sdk\platform-tools;
3)
Variable Name: PATH
Variable
Value: C:\Location To\Your
Work\Environment\adt-bundle-windows-x86-20131030\sdk\tools;
Now
check your Android SDK environment is set
Open
Command Prompt and type command android
list target like below and check your android target is displayed.
5)
Finally
Cordova Archive File
Download
and extract Cordova cordova-3.4.0-src.zip
to your working location then extract android folder cordova-android.zip.
Now
your path looks like C:\ Location To\Your
Cordova\cordova-3.4.0\cordova-android
Now we are done with our
environment setup for Cordova version 3.4.0.
Let us start with creating
Cordova PhoneGap project.
To create Cordova PhoneGap
project,
Open command prompt
Navigate to your Cordova
android location
C:\>cd C:\Location To\Your
Cordova\cordova-3.4.0\cordova-android\bin
C:\Location To\Your
Cordova\cordova-3.4.0\cordova-android\bin>
Now Use Create command to create Codova or
PhoneGap project
The general format of
create command will be like below
Create ProjectLocation PackageName ProjectName
Ex: create c:\MyFirstCordova3.4App\
com.mycompany.MyFirstApp MyFirstApp
C:\Location To\Your
Cordova\cordova-3.4.0\cordova-android\bin>create c:\MyFirstCordova3.4App\ com.mycompany.MyFirstApp
MyFirstApp
Now we have successfully
created our Cordova PhoneGap project
Next step will be to
import our project into eclipse.
Open eclipse from your
work environment.
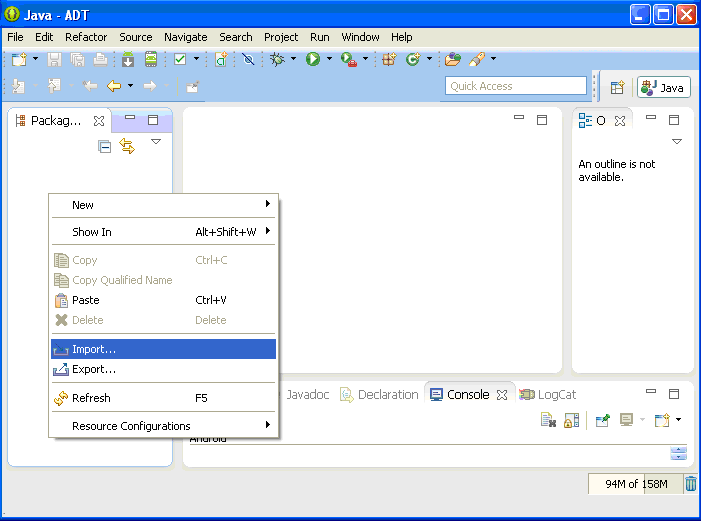
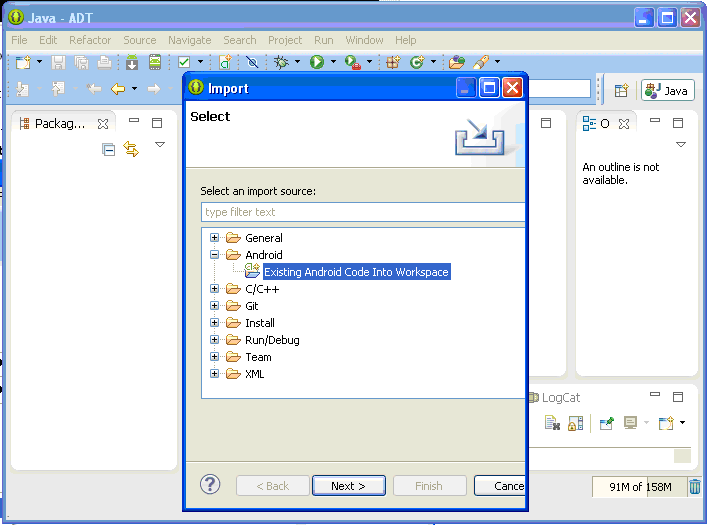
From the left project explorer pane right click and choose import -> Android -> Existing Android
Code into Workspace
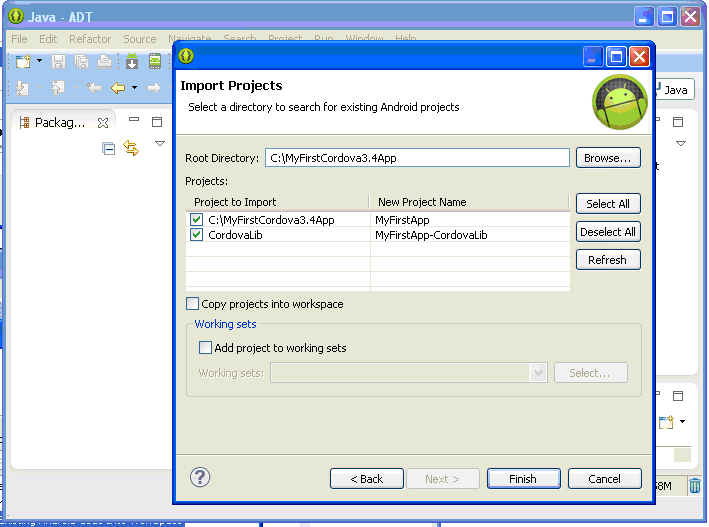
Click next and browse your
project location to Root Directory
then click Finish
Note: Do not click on Copy projects into workspace, because this will produce
some path error to your workspace.
Now you will find two
folders MyFirstApp and MyFirstApp-CordovaLib in your project
pane.
Once imported you may get few
error on import statement of Java Class file, to resolve this, add
cordovalib.jar file to your Android
Dependency folder from MyFirstApp-CordovaLib.
Now right click your
project click run as -> Android
Application. It will launch an emulator with Virtual Device you setup and
will open your Cordova Home page.
That is itJ. Now we
are ready to start.